|
Home > Help
files >>
Installing a Frontpage template
Setting up a Frontpage template
Download .zip file
Locate .zip file on your hard drive
Double click to install
Open
Your New Web Template in FrontPage 2000 / 2002 / 2003
In FrontPage, do File > Open Web
At the top of the "Open Web" dialog, click the down arrow on the "Look In" drop down box.
Select The "C" Drive.
Open the newly created "FrontPage Templates" folder.
Double click on the sub-folder with the name of the specific package to open it.
Publish wherever you wish, or leave the web template where it is.
You can publish
to a new location on your hard drive before making
changes
so
you will have the original template should you need
to start over for any reason.
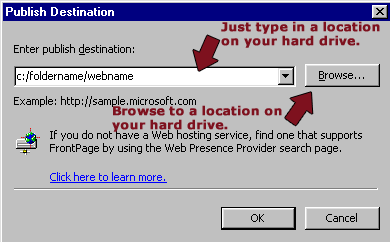
To publish to a new location on your hard drive, open the web template you just installed in FrontPage. After it is open, go to File>Publish Web> then you can type in any location in the publish to area, such as c:/foldername/ web name or if you like to have your webs in the My Documents folder, you can type in c:/My Documents/My Webs and then type the name of what you want to call your site. You may also use the browse button.

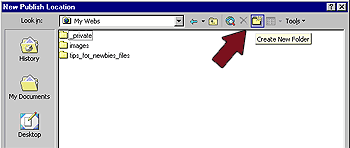
If you browse to a location using the browse button, be certain you use the "new folder" icon and make a folder with the name you want to use for your web.

Changing Button and Banner Names
Some of our FrontPage template packages use the theme feature of FrontPage. The names that appear on navigation bar buttons and page banners are dynamically generated by FrontPage based upon the names that appear on the page icons in the Navigation View flow chart. You can change the names to suit your needs provided the names are brief enough to fit on the button graphics.
For the template packages that do not use a theme, the include page function has been utilized to easily make sitewide changes. See the information below on include pages.
To change the names on navigation buttons and page banners:
- Switch to FrontPage Navigation View.
- Right click on the page icon that represents the link you wish to change.
- Type a new name.
- Right click in the blue area to "Apply Changes."
Additional information can be found in our FrontPage Navigation tutorial.
Adding
Pages in Frontpage navigation
It's easy to create new pages and add them to the navigation bars. You can expand the navigation bars to accommodate as many pages as you need.
To add a page to the nav bars:
In navigation view, select and open a page that exists on the same level of the chart as the page you wish to add.
- Save it as a new page. Switch to Navigation View.
- Drag it onto the Navigation View flow chart.
- In the Navigation View, rename the page to suit your needs.
- Customize the content and save.
Deleting Pages
from Frontpage Navigation
You can delete a page from your navigation bar without deleting it from your web by clicking on the page to highlight it in the Navigation View, pressing the "delete" button, and selecting "Remove this page from all navigation bars." To delete the page entirely, select that option instead.
Frontpage Include Files
Note that some elements that occur on all pages exist as include pages. The include pages are inserted into the main pages in order to allow you to make global changes to your site or change many pages at the same time. You will find these include pages in the "includes" folder of the web. Some examples of include pages that may be used in a web.
Header section
Main Navigation
SubNavigation bar for section main pages or child pages
Sidebar boxes or News boxes
Footer information
For a tutorial on using FrontPage "includes" files please read our tutorial on "includes".
Modifying Images
You can edit the graphics in literally any graphics program. The image folder contains a blank state of the logo or "company name" files in either .gif or .jpg format. The name sample on the pages has been used for display purposes and you may change to any font or color of your choice and add any special effects such as drop shadow or beveling. Open the blank images in the graphics program of your choice, and add text to match your site or company name.
Some images in the template package are basically
placeholders - easily changed to an image of your choice.
To maintain the integrity of the layout, you may want
to use the same pixel dimensions.
Navigation images and page banner images are often part of a theme, and should not need to be modified. Some of the template packages do not use a theme, and you will need to create the navigation buttons in a graphics program. Blank images are provided for you to add the text.
You may want to read through our tutorial on Creating
a Navigation Image in Photoshop. Although you may
not use Photoshop, it contains information that applies
to many other graphics programs, such as Paint Shop
Pro.
Related Information:
General Information on Navigation
Using Tables
Main Help Menu
Back to the Top
|

